
Set up a Kitchen Aid meat grinder attachment on your stand mixer transforming it into a versatile tool that elevates your home cooking. Whether you’re preparing ground meat for burgers, sausages, or other gourmet dishes, having a meat grinder ensures you control the quality and content of your ingredients. This guide will provide you with detailed steps on how to set up your KitchenAid meat grinder, ensuring you can begin your culinary adventures with confidence and ease. From assembling the components to attaching them to your mixer, we’ll cover everything you need to know to get started.
Unboxing and Assembling Your KitchenAid Meat Grinder:
Unboxing the Package
The first step in setting up your KitchenAid flesh is unboxing the package. Ensure that all components, including the body, grinding plates, and food pusher, are present and in good condition. Check the user manual for any additional instructions or safety precautions.
Assembling the Components
Once you’ve verified the contents of the package, it’s time to assemble it. Attach the grinding plate of your choice to the body, ensuring a snug fit. Next, affix the food pusher to the top of the grinder, making sure it is securely in place. Familiarize yourself with the different parts to ensure smooth operation during use.
Preparing Your KitchenAid Stand Mixer:
Attachment Compatibility
Before attaching the flesh to your KitchenAid stand mixer, check for compatibility. Ensure that your stand mixer model is compatible with the flesh attachment to avoid any compatibility issues or damage to your equipment.
Ensuring Proper Fit
Once you’ve confirmed compatibility, attach the flesh to your KitchenAid stand mixer according to the manufacturer’s instructions. Ensure that the attachment is securely locked into place to prevent any accidents or malfunctions during operation.
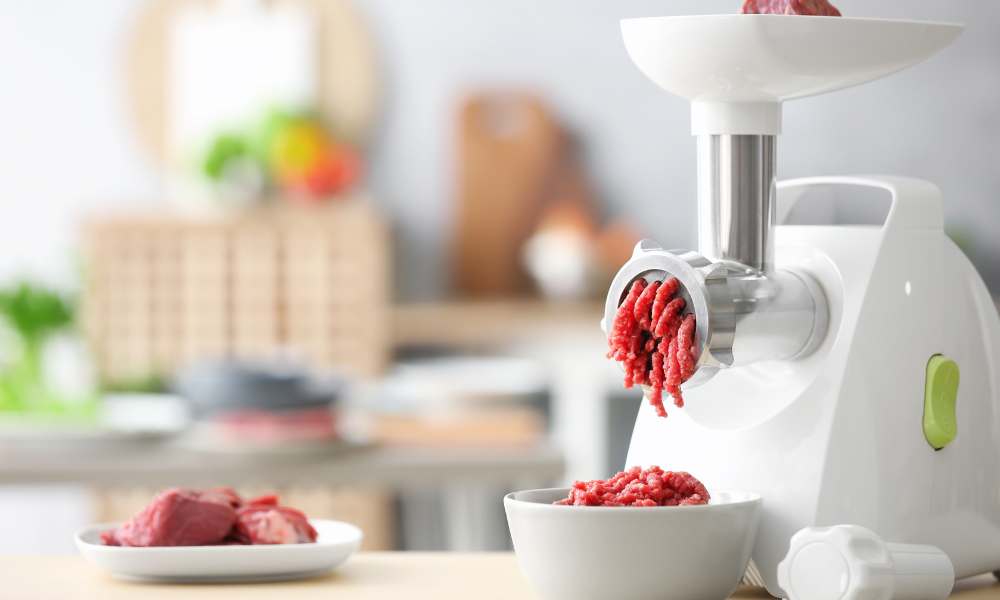
Grinding Meat with Your KitchenAid Meat Grinder:
Preparing the Meat
Before grinding meat, it’s essential to prepare it properly. Trim excess fat and sinew from the flesh and cut it into smaller pieces that will fit easily into the grinder. For best results, chill the flesh in the freezer for about 30 minutes before grinding to ensure a clean and uniform grind.
Setting Up the Grinder
Once your flesh is prepared, it’s time to set up. Turn on your KitchenAid stand mixer and select the appropriate speed setting for grinding meat. Attach the flesh to the stand mixer and position a bowl or container beneath the grinder to catch the ground meat.
Grinding Process
With everything set up, begin feeding the prepared meat into the food pusher. Use a gentle, steady pressure to push the meat through the grinder, allowing it to grind smoothly and evenly. Continue grinding until all the flesh has passed through the grinder, periodically stopping to clean any accumulated flesh residue from the plates.
Cleaning and Maintenance:
Disassembling the Grinder
After you’ve finished grinding meat, it’s crucial to clean and maintain your KitchenAid grinder attachment properly. Start by disassembling and removing all components, including the grinding plates and food pusher. Refer to the user manual for specific instructions on disassembly and cleaning.
Cleaning the Components
Wash the disassembled components of the flesh thoroughly with warm, soapy water, taking care to remove any food particles or residue. Use a brush or sponge to clean hard-to-reach areas, ensuring that all parts are completely clean and free of debris. Allow the components to air dry before reassembling the grinder for future use.
Storage Tips
When not in use, store your KitchenAid attachment in a clean, dry place away from direct sunlight and moisture. Consider storing the attachment in its original packaging or a dedicated storage container to prevent damage and maintain its longevity.
Troubleshooting Common Issues:
Grinder Not Working Properly
If you encounter issues with your KitchenAid flesh grinder, such as it not turning on or grinding meat inconsistently, check for any obstructions or blockages in the body or grinding plates. Ensure that all components are properly assembled and securely attached to the stand mixer before attempting to use them again.
Meat Not Grinding Consistently
If the meat grinder is not producing uniform or consistent results, try adjusting the speed settings on your stand mixer or using a different grinding plate to achieve the desired grind texture. Additionally, ensure that the flesh is properly chilled before grinding to prevent smearing or uneven grinding.
Use A Milk Frother
Using a milk frother is a simple yet effective way to create creamy, frothy milk for your favorite coffee drinks. Start by heating your milk to the desired temperature, then immerse the frother wand into the milk and switch it on. Move the wand up and down in a circular motion to aerate the milk and create foam. Once you’ve achieved the desired frothiness, remove the frother from the milk and pour it into your coffee. Clean the frother wand thoroughly after each use to maintain its performance. Enjoy your perfectly-frothed milk beverages!
Conclusion
Setting up and using your KitchenAid flesh grinder attachment is a straightforward process that can greatly enhance your culinary capabilities in the kitchen. By following the steps outlined in this guide, you can enjoy freshly ground flesh for a variety of delicious recipes with ease and confidence.